Mushclient

dum-ee-icon

Mushclient is one of the older contenders these days. It might not be the most eye catching piece of software, but it still holds its own from a functionality standpoint. Mushclient is the most used client in our player base, and the fact that many have used it for 10 or more years is the biggest factor to have not switched to Mudlet. It does have the biggest repository of custom built scripts and plugins that the player base has curated through the years, though as you’ll see in this guide, it can be difficult to keep them up to date.

lotj-client

Installation

deathstar-purple

This section displays the screenshots from a Windows OS and show you how to install Mushclient. While Mushclient can be run in Linux operating systems with WINE, this is a topic for advanced users and not one we will cover here.
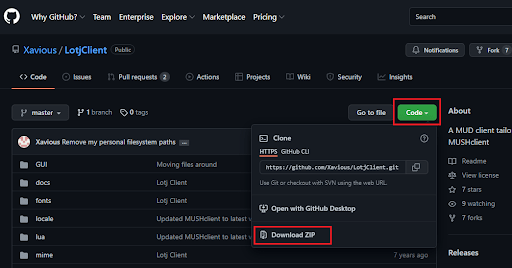
If you'd like to use Mushclient without all the plugins, and don't already have it installed, you can find it at http://www.gammon.com.au/downloads/dlmushclient.htm

When the file has downloaded, run it to start the installation. You may receive a prompt about allowing an application from an unknown publisher to modify your device, click yes to continue with the installation.

Follow the steps in the Installation Wizard to install Mushclient on your computer. When it finishes, you are done with the installation step!

This explains how to install the LOTJ client without Mushclient already installed. If you already have Mushclient, please see the section below under LOTJ Client for manual installation instructions.

  1. A pre-packaged version of Mushclient with LotJ-related plugins already installed is available at https://github.com/Xavious/LotjClient. You’ll want to go there, click the Code dropdown on the upper right side, and click Download ZIP at the bottom.
  2. When it has finished downloading, extract the downloaded file in whichever way you prefer.
  3. You’ll want to extract it to a location that’s easy for you to find. Ideally somewhere in your Documents folder is usually a good place but you can put it wherever you want, though you should avoid putting it in Program Files or other places that need Administrator access to write to.
  4. Once it's extracted, you're finished with the installation step!

LOTJ Client

deathstar-purple

The LOTJ client can be configured in a few ways. You can either run the installer that generates its own copy of Mushclient along with it (see instructions above under installation), or you can install the package manually.

  1. If you already have Mushclient installed but would like to add the LotJ Client plugins to it, you can find them at https://github.com/Xavious/LotjClient. You’ll want to go there, click the Code dropdown on the upper right side, and click Download ZIP at the bottom.

  2. When it has finished downloading, extract the downloaded file in whichever way you prefer.

  3. The default suggested location for extracting it will probably be in your Downloads folder, which is perfect for what we're going to be doing.

  4. When it's extracted, you'll want to find the "worlds" folder inside, and copy the entire folder.

  5. This step is crucial: Go to your existing Mushclient installation and paste the "worlds" folder from the client you just downloaded into it. If you've copied the right thing and pasted it to the right location, you should see a prompt like this about replacing files with the same names. You can go ahead and skip those files, it doesn't really matter, but if you don't see this prompt you should double check the previous steps.

  6. Once it's copied, the end result should be a new Legends of the Jedi.MCL file in your worlds folder and a bunch of new plugins in the plugins folder. Now, you can go ahead and delete what you downloaded and extracted, all the important stuff has been added to your existing Mushclient installation and you are done with the installation step!

Connecting to LOTJ

deathstar-purple

Connecting through Mushclient is a simple process as it just requires you to have the address and port. You can find more about the steps necessary below.

  1. To connect to LotJ in Mushclient without the premade LotJ Client world file, you'll need to launch Mushclient and select File > New World
  2. This will open a window prompting you for the connection details.
  3. Fill in an easy to remember name for World Name, I suggest something like "LotJ", then fill out
    TCP/IP Address: legendsofthejedi.com
    Port Number: 5656
    

  4. Then click OK.

If all's well you should be connected to the game and seeing something like this:

Don't forget to SAVE your world file with Ctrl-S or File > Save World Details!

  1. To connect with LotJ using the LotJ Client plugins and world file for Mushclient, just open the Legends of the Jedi world file in Mushclient. If you're using the Mushclient download with the LotJ Client, the LotJ world file will open automatically when you launch Mushclient. If you added the LotJ Client plugins to your existing Mushclient installation, you will need to click on File > Open World and select the Legends of the Jedi world file.

  2. Either way, once you open it you should see something that looks like this:

You're now connected to LotJ!

Frequently Asked Questions

deathstar-purple

These are some of the more frequently asked questions about Mushclient.

Your best course of action to get help with Mushclient is to join our Discord server and ask on the #scripting channel. If that fails, you can try asking on OOC or even RPCchat.

Many of our players have made GitHub repositories for their Mushclient plugins to help automate some features on LOTJ.

LOTJ Community Github

https://github.com/LotJCommunity/LOTJ-Mushclient-Scripts

Xavious's Github

https://github.com/Xavious/lotj-plugins
https://github.com/Xavious/LotjClient

Johnson's Dropbox (mostly outdated)

https://www.dropbox.com/sh/iqwhx27wte04pd4/AACwPXCbD95gIyjKoXCrWTlta

You can download the plugin and required sound files here.

https://github.com/Klor56/LOTJ_Plugins

Author Klor
Published
Categories play now
Views 3758

Join Our Community

Vote For LOTJ!

LotJ’s Newsletter

2024 Server Donations